Door lock device
To understand how to change the door lock on a VAZ, it is important to understand the structure of the mechanism itself. The larva is a metal core that is activated when the key is turned in the well. Protection is provided by locking the internal teeth. If incorrect operation of the locking system is noticed, the entire lock or its cylindrical part is replaced. When the key enters the device, the internal pins begin to move. When problems arise when opening/closing the mechanism, it means that the teeth do not fit into the grooves.
If the pins diverge in different directions when opening, then when closing, a disconnective displacement occurs. This encoding is activated when the key is turned. The reasons for the breakdown may be as follows:
- creak;
- difficulties when inserting and removing the opening object;
- jamming;
- internal or external damage to the cylinder;
- The key does not go all the way into the hole.
When the lock is used for a long time, parts wear out. In order not to completely change the closing device, you can remove the cylinders and install a new one.
Ignition replacement and check
To replace the ignition switch, you need to perform all the steps in a certain sequence:
- Before replacing, you must remove the negative terminal from the battery.
- Remove the steering column cover and the two switches located under the steering wheel.
- After this, you need to insert the key into the ignition switch and set it to the zero position. This is necessary for the anti-theft device to be disabled.
- Next, unscrew the 4 bolts that hold the ignition switch. If bolts with sheared heads are installed, knock them down using a hammer and chisel.
- After unscrewing (knocking down) the bolts, remove them from the holes using pliers.
- On the left side, remove the bracket, and then on the right side, remove the ignition switch.
- Then disconnect the wire block from the electrical connector.
- Get under the dashboard and disconnect the ignition switch connectors from the relay.
Installing a new lock must be done step by step in reverse order.
To check the contacts on the wire block, use an ohmmeter. The device must display zero. If his readings are different, change the contact group.
To change a contact group, you need to do the following:
- Using a screwdriver, unscrew the screw that secures the cover.
- Bend back the plastic latches that hold the cover in place, then remove it.
- Remove the contact group.
The contact group is also installed in the reverse order.
Not in all cases it will be possible to find four bolts on the steering column on a VAZ-2109. On some models it can be secured with two bolts and a hook.
Tools
To repair or replace a car lock, you need to prepare:
- flat-head and Phillips-head screwdrivers;
- pliers;
- socket wrench 8;
- silicone grease;
- larva
If desired, you can immediately replace the standard part with a European pen, which is purchased in advance.
Repair work is carried out in a well-lit room and at a comfortable temperature.
General practical information about the design of the lock cylinder
Lock cylinder VAZ 2110
First, you need to imagine in general terms what the door lock cylinder of the VAZ 2110 means. From a practical point of view, the lock cylinder is the internal cylinder mechanism. Therefore, if the main cause of the malfunction lies in the cylinder, then simply replacing the internal cylinder is sufficient. What will happen when replacing a car lock cylinder:
- will allow you to return the lock to good condition, without changing it;
- will increase the current level of security of the castle itself;
- there will be a practical opportunity to replace the old key with a new one;
- By additionally equipping the lock with an armor plate, it will be possible to increase the degree of protection of the lock cylinder.
Lock cylinder for VAZ 2110
Note. When replacing the cylinder, the mechanical configuration of the lock changes, therefore, making a new key to replace the old one is a prerequisite for the operation.
Repair or dismantling of interior door locks
When replacing the rear door lock of a VAZ 2109, it is important to follow the algorithm of actions:
- To remove the handle, use a screwdriver to unscrew two bolts: top and bottom.
- The cover, plug and casing are removed. The facing material is secured with special latches. It is important to dismantle them carefully so that the plastic elements do not break.
- The panel is removed and the external fasteners are removed using a size 8 wrench.
- Access to traction is gained. It can be unscrewed freely using a screwdriver.
- The handle is removed along with the rods, the tip is dismantled.
- The core of the cylinder device opens.
- To change the cylinder, it is important to remove the return spring.
- After installing the new core, we return the spring to its place. A pin is installed on the tip of the rotary rod.
- The lubrication of the elements and the functionality of the mechanism are checked.
- The assembly is performed using the reverse algorithm.
Sometimes it is necessary to replace the wires that are connected to the lock. If a small break is detected, the electrical wiring is partially changed.
Replacing the lock cylinder itself or the contact group
Replacing the VAZ 2109 lock cylinders requires the following tools:
- New cylinder complete with keys
- Thin clock screwdriver
- Phillips screwdriver
- Fine drill
- Chisels
- Hammer
- Pliers
In the event of any breakdown, it is not necessary to replace the entire lock; if the cause of the malfunction lies in replaceable parts, then a partial repair of the lock is performed and replacing the lock cylinders on the VAZ 2109 makes sense when the key stops rotating freely in the keyhole. Another option for partial repair is to replace the contact group; for this, a minimum of tools and a little understanding of the device are enough. Our instructions will help you understand the device:
- Nothing and no one forbids you to change the entire lock every time, and even go to a service station if you are satisfied with the price
- After removing the casing, access to the switch lock opens
- The lock cylinder can, in principle, be removed at this stage
- Therefore, we pull out the side pin that holds it in the lock
- This can be easily done with a thin screwdriver (clockwise) while tapping it with a small hammer
- If the pin cannot be pulled out in this way, then try to drill out the cylinder carefully using a thin drill
- If it is more convenient for you to remove it first, remove the ignition switch before proceeding to replace the cylinder, to do this you need to unscrew the bolts securing the ignition switch to the steering column
- This must be done using a hammer and chisel, as these bolts have sheared heads.
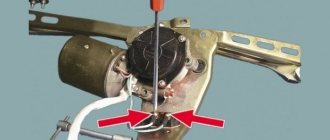
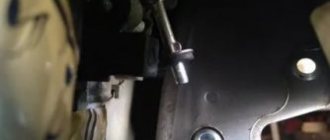
- Use a chisel to loosen them slightly, and then unscrew them with pliers, as in the photo below
Loosen the bolts securing the lock to the steering column
- Now we remove the bracket and the lock itself from the column, be sure to disconnect its electrical connector
- We unscrew the screw securing the ignition relay and remove it from under the panel
- Disconnect the connector
- Disconnect the “mass” wire
- Using a Phillips screwdriver, unscrew the screw
- Then release the latch and remove the cover, then the contact group
- So we pulled the switch
- We remove the cylinder with our own hands and the ignition switch, as already described above
- We are replacing it
- We check the operation of the lock with a new cylinder installed, to do this we turn the ignition key
- After installation, do not forget to check the correct operation of the locking mechanism, our steering shaft
- When the mechanism does not work when turning the steering wheel fully, you need to adjust the location of the lock on the steering column
- Only after completing the adjustment of the location and checking the functionality of our locking mechanism, you can tighten the bolts until the heads come off completely, use a “10” spanner for this purpose
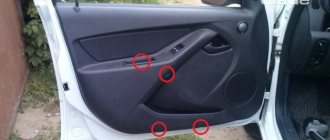
We will talk here about the front door lock on the VAZ 2109. It should be noted that the rear door (clapper) has a similar cylinder. And this instruction can be used for her as well. The work is carried out in the following order:
- We remove the decorative lining from the doors. This must be done carefully, do not forget that it must be installed in place after completion of the work;
- Raise the glass completely. If it is omitted, then you will have more problems during the work process;
- The seal located at the bottom is pressed out using a screwdriver. Be careful, a slipped screwdriver can cause injury;
- The spring retaining clips are removed. One is located at the bottom, and 3 are at the top;
- The protective film is removed;
- Next, we disconnect the rod from the handle key switch (external) from the inside;
- Unscrew the bolts that secure the lock. There are some peculiarities here. At the factory they are secured with sealant, so it is better to use an impact screwdriver. This will allow you to unscrew them quickly and without much strain;
- The outer lock is removed along with the handle. This is done using a tube wrench, which is used to unscrew the fastening nuts. Next, the inner handle is unscrewed; to do this, unscrew 2 screws with a Phillips screwdriver. Make sure that the handle does not fall inside the door.
- To do this, it is advisable to hold it. The removed handle is checked for damage;
- The outer part of the handle is pushed in, after which it can be pulled in along with the main locking mechanism;
- The rubber retainer is removed from the end of the rod. It is best to do this with pliers, but often it can be done even by hand. The handle is removed from the rod by turning it;
- The internal rod on the lock is held in place by a locking bracket; it is pryed up with a screwdriver and pulled out. After which the traction is removed;
- The rod holder, which is designed to lock, is rotated and it is removed. The fastening elements holding the lock from the outside are unscrewed;
- The handle is removed;
- Now we replace the larva itself. To do this, use an awl to pull out the locking pin holding the leash;
- The leash is removed;
- Pry up the spring of the cylinder and remove it. The easiest way to do this is with a thin screwdriver;
- The key is inserted and the cylinder is removed;
- Assembly is carried out in reverse order.
Features of door adjustment
Incorrect operation of the lock may be caused by problems with the door card. After long-term use, it sags, and sometimes it is simply installed incorrectly. Basic actions:
- The lock latch, which is located on the stand, is adjustable. To do this you will need an impact screwdriver. The screws are first loosened, adjustments are made, then the fasteners are tightened.
- Adjusting the response part if there is no softness when closing or a squeak is heard. The door moves outward using external adjustment bolts.
- The bracket is dismantled using a hammer. After several blows the door moves. After this, the operation of the mechanism is checked. If the problem does not go away, the procedure is repeated.
How to properly replace door hinges.
The repairs made, of course, depend on the cause of the sagging and the condition of the hinges. If the driver's door is sagging due to worn-out hinges, then you can replace the axle (if the hinges themselves are in good condition), but it is still safer to replace the entire set, since the entire structure is subject to wear.
To replace door hinges you need to do the following:
- First, remove the driver's door;
- then the loops are cut off, since they are welded;
- to remove all the remnants of the loop, you need to drill them out;
- To install a new hinge, you need to make (drill) a hole on the side for a bolt, which after installation will need to be trimmed with a grinder.
After the replacement has been made, it is very important to make adjustments following the algorithm:
- To facilitate adjustment, the mating part of the lock is dismantled;
- The correct position of the car door along the vertical axis is determined. To do this, it is closed and the offsets are determined. We can eliminate this defect by loosening the door hinges and then raising (or lowering) the doors;
- The fasteners are tightened well and the location relative to the opening is checked. If the end part is shifted downwards, the lower fastening is released. After this, using thin metal plates, achieve the normal position of the door, placing them under the hinge. If, on the contrary, the edge of the door is raised, the same thing is done only with respect to the top hinge.
- Horizontal position is adjustable. If the door is too recessed into the interior, the hinges move closer to the edge. Otherwise (when the door protrudes outward), the hinges are moved inside the car. This process needs to be given special attention, since a violation of the horizontal position can cause the door to jam due to improper functioning of the lock.
- After the doors are correctly aligned, the mechanical lock and its counterpart are adjusted.
Replacing and adjusting the trunk lock
The luggage compartment is equipped with an identical lock as the driver's door. For dismantling you will need a standard set of equipment. Step-by-step instruction:
- The handle unscrews. The trim, trim, and panel are removed.
- The two dome lamp terminal connectors, the windshield wiper motor and the actuator are disconnected.
- The lock is removed using pliers. The rods are turned off and the spring is removed.
- A new mechanism is inserted. The spring returns to its place.
- The rod is screwed on. Electronics are connected.
The price of a complete set of locks for the driver's door and trunk starts from 500 rubles.
How to replace the ignition switch, check the contact group and replace it on a VAZ 2108-VAZ 21099?
Replacing the ignition switch:
Removal: 1) Starting with “The battery is a rechargeable battery,” unscrew the nut that holds the “-” terminal on the battery and then remove the terminal. (How to remove the negative terminal from the battery, see the article about “Replacing the battery on a VAZ”, in the “first” paragraph)
2) Then remove the steering column cover and both steering column switches. (How to remove the casing and both switches, see the article: “Replacing under-steering switches”)
- Further, for clarity, the operation will be shown with the steering wheel removed, but you can still remove the ignition switch without removing the steering wheel.
3) Next, insert if the lock allows it, then insert the ignition key into it and put it in position “0”.
Note! The key must be installed in this position only to disable the anti-theft device!
4) Now remove the four bolts that secure the ignition switch. If you have these bolts with a cut off head, then knock them down with a hammer and chisel. (Be sure to read the “Important!” paragraph)
It will be useful: How to tint car windows with your own hands?
Note! If that doesn’t work, then try drilling out all four bolts, but just do it carefully without damaging anything!
5) Once the bolts are loosened, use pliers to remove them from the hole.
6) Next, remove the bracket on the left side, and the ignition switch on the right.
7) Now disconnect the wire block from the electrical connector.
 And finally, crawl under the dashboard, and there, disconnect the connector going from the ignition switch to the relay.
Installation: Installation of a new lock is carried out in the reverse order of removal.
Checking the contacts of the wire block:
1) First, remove the lock from the car using the text above.
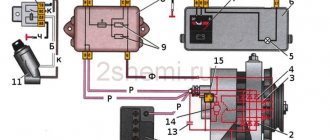
2) Next, using an “Ohmmeter” or a “Multi-meter” with the “Ohmmeter” function enabled on it, connect its leads to the electrical connector and then look at the readings of the device.
Note! The device should clearly display “0”; otherwise, replace the contact group!
Replacing the contact group:
1) First, on the removed ignition switch, use a screwdriver to unscrew the screw that secures the ignition switch cover.
2) Then use a screwdriver to press out the two plastic latches securing the lock cover.
3) Then remove the cover.
4) And finally, remove the contact group from the ignition switch.
Note! Installation of the contact group is carried out in the reverse order!
Important! Not on all cars of the Samara family the ignition switch is attached to the steering column with four bolts; on some cars it is attached only with two bolts and on top it is secured with a hook indicated by a red arrow!
Additional video material: Below we have prepared a video related to replacing the ignition switch on cars of the Samara family.
Recommendations for changing the cylinder in a VAZ 2109 lock
If you disassemble the core, you can avoid replacing the cylinder or the entire mechanism. When the door opens with a creak, then most likely the internal pins are not deformed. Then lubrication work is carried out and the serviceability of the device is checked. Tips from the experts:
- Partial repairs will bring life back to the castle for a short period of time. If serious problems arise, it is better to immediately replace the larva.
- It is recommended to use silicone during lubrication.
- When dismantling, you will need a set of screwdrivers: flat, Phillips, impact.
Experts advise purchasing clips in advance that hold the casing and spring, since during dismantling these parts most often become unusable.
Instructions for removing the front door lock on a VAZ 2109
A reliable lock in a car is not only the prestige of the manufacturer, but also the car owner’s confidence in the safety of his car, and peace of mind for the safety of the contents in the car during his absence. Sometimes, for various reasons, there is a need to change it.
Replacing the front door lock on a VAZ 2109 is not a difficult task, and does not even require a mandatory visit to a car service center or the services of an expensive technician. Anyone can replace the lock with their own hands. The main thing is to be patient, prepare the necessary tools and not put off the replacement.
How to replace a lock
The design of the locks on the front and rear doors of the car is fundamentally the same, the difference lies in the installation of the lock switch cylinders on the external handles on the front doors. Instructions on how to replace the front door lock are presented below:
- The lower seal is pressed out, and three spring clips are removed from above to secure the protective film and one from below.
- The protective film is removed from the door.
- Inside the lock, the lock switch and external handle rods are disconnected.
Disconnection points for switch rods
Tip: During assembly, sealant was applied to the threads of the screws, so when twisting, you need to use an impact screwdriver.
- The outside door lock is removed.
- Unscrew the two screws securing the internal handle of the device.
- The handle is pushed inside the door.
- The internal lock and handle are pulled out of the doors, as shown in the photo.
The handle and lock are removed from the door
- The rubber holder is removed from the end of the rod.
- The handle is removed from the rod. In this case, it needs to be cranked.
- The locking bracket is detached from the lever pin.
- The rod of the internal handle is disconnected from the internal lock lever.
- The plastic holder is rotated and the end of the rod is removed from the lever to lock the device.
- Unscrew the two nuts securing the outer handle of the lock.
- The handle is removable.
- The plastic rod end is removed from the door lock cylinder and removed.
- The locking spring is removed. To do this, its ends are removed from the slots on the lock handle and cylinder.
Removing the retaining spring
- A key is inserted into the lock cylinder and the part is removed from the handle.
- Repairs and replacement of faulty elements are carried out, or a new lock is installed.
- Assembly of the unit occurs in the reverse order.
- The lock can be adjusted if necessary. To do this, loosen the screws and move the latch:
- outward, when the door is tightly closed;
- inward, if the door is not closed tightly;
- down if the door is raised when closing.
- After adjusting the device, tighten the screws.
Tip: If you need to remove the retainer, you must first trace its outline on the body pillar. This will help maintain the door lock adjustment during installation.
How the door locks are removed on a VAZ 2109 car can be clearly seen in the video.