Chips, cracks and serious damage to the windshield are an annoying problem for motorists. Sometimes there is simply not enough time for urgent repairs and taking the car to specialists, so the situation requires timely solutions. Fortunately, even a beginner can handle the process of replacing glass at home.
There are common fears in the minds of drivers regarding this windshield installation procedure. Of course, experience is extremely necessary, but how can you get it without practical action? By following a certain point and adhering to the basic rules, you can easily remove the damaged part of the car and replace it with a new one.
To dispel unpleasant thoughts and the beginnings of fear, it is important to mention the cost of car repairs at a service station. It often costs a hefty amount, especially when replacing a heated windshield that cannot be repaired. Therefore, DIY home procedures have huge advantages.
Reasons for replacing glass
There are only 2 reasons for carrying out repair work on the windshield:
Malfunction or defect - chips, holes, cracks, scratches. Most drivers face this problem, which grows over time and turns into a disaster. A whole “web” of cracks blocks the entire view of the motorist, risking people’s lives and health.
The time required to replace a windshield depends on the type of car, but on a passenger car it will not take more than 2-3 hours. Do not risk yourself, your loved ones and other motorists on the road.
Penetration of liquids through the seals indicates poor-quality glass installation. Most often, a leak can be eliminated using sealant, but sometimes the material needs to be completely re-glued. If the leak is small, the windshield seal may need to be replaced. It is removed using a thin screwdriver and replaced with a new one.
Replacing a windshield at home will not happen without the necessary tools and a dry room. Make sure the garage is draft-proof and clear of sharp or bulky objects.
Recommendations for replacement
To ensure that your windshield installation is as efficient as possible, you need to follow a few simple recommendations.
Tips for replacing your windshield
- You can't skimp on materials . Glass in a car is changed infrequently, so it is not advisable to skimp on it or on glue. When choosing a composition, you need to consult with specialists.
- Do not slam doors after installing the windshield . Immediately after installing the parts, the doors must be closed carefully to avoid the formation of excess pressure in the cabin. Otherwise, the air flow will press on the glass.
- Wear protective gloves . You cannot ignore safety rules, because when working with glass there is a risk of getting cuts. It is also recommended to wear special glasses when replacing auto glass.
- Wait for the glue to dry completely . After installing the glass, it is advisable to wait a day, but it is better to avoid traveling for 2-3 days. The same can be said about washing a car - at least 2 days.
- Replace the windshield wipers. Using old wipers on new glass may cause scratches.
Do not forget to install a rain sensor after replacement.
It is not necessary to replace the auto glass yourself, because if you do not have free time, then you can entrust this task to specialists from automobile workshops. True, this procedure will cost much more, because in addition to the materials themselves, you need to pay for the services of repairmen. Therefore, if you want to do the work yourself and do not have extra money for the services of specialists, you can change the windshield yourself. You just need to follow the instructions given above.
You should not wash your car immediately after replacing the glass.
Materials and tools
Before starting work on the windshield, you need to wash the car and keep it indoors for exactly one day (to dry).
For high-quality and safe glass replacement, ask a second person for help. It is much easier to cope with heavy work together - one holds the suction cups, the other works with the string, and so on:
- Metal string with holders.
- Sharp wire line or awl.
- Sacral and thin screwdrivers.
- Glass holder in the form of suction cups.
- Nut wrenches.
- Flat gravel.
- Painting adhesive tape.
- Sealant.
- Device for applying glue.
- Protective primer.
- Solvent for old glue.
- Absorbent swabs and cloth gloves.
The entire list of materials can be found in a specialized automotive store or online. It is important to note that the salon cost of replacing a windshield is 3 times higher than the cost of all tools.
Necessary tool
So, we will proceed from the fact that we are not professionals and will have to change the windshield for the first time in our lives. If you approach this matter with enthusiasm and diligence, you can replace the glass, even if it takes a little more time than a professional.
So, to change your windshield, first of all you will need new glass and the necessary set of tools. Of course, when you want to replace the glass on your car once and not have to do it again, then you shouldn’t buy a set of tools. It’s better to look for it from friends so as not to spend extra money on it - you won’t have to replace it every other day. But if you have already decided to purchase, then you should not take the cheapest ones - this will affect the quality of the installation yourself.
Here is a sample list of what you will need to insert new glass:
Special suction cup for glass installation
- A special knife that will help pry and pull the old windshield out of its seats;
- A retractable construction blade, which you can use to clean the grooves from the sealant remaining there;
- Primer, which is needed to prepare seats before installation;
- Fresh sealant and a gun that will help squeeze the liquid out of the flask;
- You will also need a so-called activator. It is responsible for the rapid hardening of the sealant;
- Mounting tape, which is needed to fix the new glass to the body before it hardens.
Separately for each car, a corresponding molding or rubber band is purchased, which frames the glass around and finally fixes it. Without this element, it will be impossible to replace the glass, so before removing the old windshield, find this rubber band.
Preparation and dismantling
To install a new glass yourself, you first need to remove the old one from the car body. To do this, you will need the same knife that was described above - it is inserted between the rubber seal and the glass and slowly drawn along the contour, cutting the old sealant. Go section by section until the glass comes out freely. Pay special attention to the bottom edge to avoid accidentally damaging the dashboard. After you have removed the old windshield, use a utility knife to remove any remaining sealant. This must be done, since it will not be possible to install new glass on a layer of dry sealant. Pieces of molding will also have to be pulled out if they are left somewhere.
At the next stage, you need to take the new glass with your own hands, or better yet with an assistant, and try it on the free space. If there are special grooves or bends somewhere, then in these places you need to make marks with a marker so that you can simply align the marks later. As a rule, the average car enthusiast does not have a stand for a windshield, so replacement and preparation will take place directly on the hood, which it is advisable to cover with a blanket. Now use a special mixture to degrease the edges of the glass and the grooves on the body - this is necessary so that the sealant adheres better and grows into the structure. If you don’t have anything suitable, then take regular alcohol, it is also quite suitable for this.
Now we move on to priming; spread the primer in a thin layer over the entire surface of the groove. A special brush or swab is suitable for this; these tools are found in painter’s kits. Apply primer to the glass with your own hands carefully, only so that it remains on the end surfaces that will be in contact with the groove in the body.
Removal process
Using a thin screwdriver, remove the seal along the entire front surface of the car. Next, we carefully disassemble all the unnecessary parts on the glass: wipers, moldings and protective plastic coating.
Changing the engine oil with your own hands - step-by-step instructions on how to correctly, quickly and easily change the oil in the engine and transmission (125 photos and videos)Do-it-yourself speed controller - how to make a simple adjustment device or smooth descent (120 photos)
- Can a non-owner apply for compulsory motor liability insurance?
In the cabin, it is necessary to protect the dashboard from further action.
We remove the seal from the inside of the cabin, and also remove the front pillar cards through the latches. Using a screwdriver, remove the screws and visors in the interior.
We eliminate all unnecessary wires that interfere with further work.
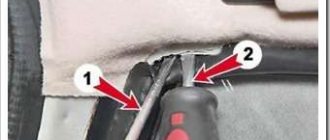
We pierce the old glue with a sharp awl. We insert strings into the holes and begin cutting off the sealant from different sides. It's better to work together.
After completing the action, carefully remove the glass using suction cup holders. Use a solvent to remove the old sealant. Place damaged glass on cardboard or a blanket to avoid splinters on the floor.
Do-it-yourself engine repair - major restoration and maintenance of an internal combustion engineDIY bumper: how to make a unique polymer bumper for a car at home (125 photos)
Do-it-yourself car painting - preparation for coating and the main stages of high-quality car painting (100 photos)
Even a beginner with 1 person can handle a car. But, if you get around to replacing the windshield on trucks, you need to involve 2-4 people in the dismantling. Heavyweight glass differs greatly not only in distance from the ground, but also in weight categories.
What is the function of a glued windshield?
Let's take a closer look at the function of a glued-in laminated windshield.
- The rigidity and strength of the body increases due to the integration of the windshield into the body structure. There is no need for additional supporting structural elements of the body, which improves driver visibility. In particular, the structural strength of the roof increases by 60%. Thus, the windshield increases the protection of passengers in the event of a vehicle rollover.
- The aerodynamics of the car are improved by eliminating the protruding rubber frame of the glass.
- The windshield on modern cars serves as a stop for deployed front airbags. The front airbags are designed so that they rest against the windshield when deployed and impact the occupants. Therefore, it is very important that the windshield is glued correctly and does not have cracks. It must remain in the opening during an accident.
- The glued windshield prevents passengers from being ejected during an accident, thereby reducing their injury.
New glass installation process
We treat the boundaries of the body and glass with a primer that improves tenacity.
We install a new seal. Apply sealant to the contours of the body.
Using suction cups, install the glass into the opening and fix it. It's better to use tape. We return moldings, protective film and wipers.
It is important to protect the glass from moving, so we leave the car alone for 24 hours.
Polishing a car with your own hands - a step-by-step master class on how and how to polish a car’s paintwork (70 photos)Polishing headlights with your own hands - how and how to properly polish headlights at home (100 photos)
Replacing thresholds with your own hands - advice from professionals on repairing the bottom and thresholds (120 photos)
After removing the protective layer of masking tape, you need to wash the car and check the tightness of the seams. If leaks are detected, we perform the procedure of additional application of glue-sealant.
How long does it take for a windshield to dry after replacement?
Replacing a windshield is a rather complicated and painstaking procedure, so it should be entrusted to professionals. Otherwise, no one will give a guarantee for the result, and the damaged double-glazed window will have to be paid for out of your own pocket.
Regardless of who installed the new glass, it is important to take into account the operating rules after gluing. One of the main questions that interest car owners is how long it takes for the windshield to dry after replacement.
The exact curing time of the sealant depends on the specific composition used for gluing. If you install the glass yourself, carefully read the instructions on the package, and if you take the car to a workshop, follow the recommendations of specialists.
As a rule, the glue hardens in 1.5–3 hours, dries in about a day, and completely crystallizes only after three hours. Despite the fact that you can move the car after just a few hours, you need to do it very carefully. After a day, you can drive as usual, but it is still best to remain careful for three days after replacing the glass.
If you are replacing glass yourself, it is also important to consider how long the glass primer takes to dry. This information is indicated on the packaging. If you insert the glass too early or, on the contrary, dry out the primer, some areas may not adhere well.
To more accurately determine how long it takes for a glued windshield to dry, you need to take into account the time of year. In general, the replacement technology in winter and summer is the same, however, in winter the procedure can only be performed indoors, while in summer replacement outdoors is permissible.
If we take into account the difference in air humidity, then in summer the sealant hardens on average in 1.5 hours, and in winter - in 2.5–3 hours. During this time, it is prohibited to open the doors, windows of the car or move it. Any movement can cause the glass to vibrate, causing the seal to be broken.
How to check glass
Before picking up the car from the workshop, you can check the quality of the work performed yourself. And if you replaced the double-glazed window yourself, first check in the instructions how long the windshield should dry after gluing it with the selected glue. If you start checking before drying, you can ruin the work.
To test the glass for strength, press it from the inside and listen: there should be no cracking.
Regardless of how long the windshield adhesive takes to dry, it is recommended to check for tightness only after three days, when the adhesive has already crystallized.
To ensure accurate results, it is best to wash your car at a professional car wash using high-pressure washers. After washing, carefully check the seam for leaks.
If there are any, and the replacement was carried out in a workshop, the work will be corrected under warranty.
Rules for operating a car after replacing the windshield
Despite the fact that 1.5–3 hours after replacing the double-glazed window you can drive a car, it is not recommended to immediately return to your usual driving style. The first few days you should be extra careful. To do this, follow simple rules during the first three days:
- ♦ If possible, avoid potholes on the road and do not run over curbs.
- ♦ Do not park on uneven surfaces - the car should not be parked on an incline for long, as the sealant has not yet fully set.
- ♦ Avoid exposure to rain and snow for the first day, and it is better to wash your car only after three days. In some cases, washing the next day is allowed, but it is better to check this with the workshop where the replacement was carried out.
- ♦ Don't slam doors too much.
- ♦ Do not abuse the stove and air conditioner.
- ♦ Do not accelerate over 70 km/h.
If you are not careful, the seal of the adhesive may be compromised. In addition, experts recommend replacing the wipers, since sand particles usually remain on the old ones, which can scratch the new double-glazed window and significantly reduce its service life.
We recommend: Balancing the driveshaft