Causes of malfunctions
The main cause of the malfunction is simple mechanical wear. Any oil seal is, by its nature, a consumable - after a certain period of time it begins to deteriorate, since it is made of an elastic material.
The malfunction may manifest itself in the form of changes in shape, swelling, scarring, rupture or chipping of the material from which the consumable is made. Another manifestation of a malfunction may be the cuff being completely squeezed out of the seat.
Other causes of problems with the camshaft oil seal are incorrect selection of consumables, manufacturing defects, or incorrect installation. In these cases, the oil seal also does not perform its functions and needs to be replaced.
List of tools
To replace the camshaft oil seal on VAZ-2110 and 2112 16 valves, a minimum set of tools is required. These include:
- key to “10”;
- key to "17";
- Slotted screwdriver;
- Mandrel for pressing;
- A small amount of motor oil.
A pit or lift is not required for manipulation. The unit is fully accessible from the engine compartment. On VAZ-2110 cars there are 8 valves and on 16 valve units the oil seal is located under the camshaft pulley, on the right side in the direction of movement of the car.
Diagnostics
Diagnosis of a malfunction of the camshaft oil seal is carried out visually. Oil marks on the timing belt cover may indicate a cuff leak. For a more accurate diagnosis, remove the belt cover and inspect it. In the event of a malfunction, you can find traces of wear or even the belt jumping over one or more pulley teeth due to moisture.
Also, a seal malfunction can be detected during a scheduled replacement of the timing belt - it is during the procedure that oil leaks can be detected on the belt itself or on the camshaft gear. Another reason to replace the oil seal is deformation of the seal. Even if there are no oil leaks at the moment, they will certainly appear if the shape of the oil seal changes.
When does a camshaft oil seal need to be replaced?
Oil seal or stuffing box seal - this name came to us from the time when hemp soaked in fat was used to seal moving parts in mechanisms. Just like that, simply, the name “oil seal” appeared.
Naturally, it is difficult to imagine a modern camshaft oil seal made of hemp. More modern and efficient materials are now used for oil seals.
The natural answer to this question is: “When the oil seal leaked or the camshaft oil seal was squeezed out.”
And we will find out about a malfunction of the camshaft oil seal during the next timing belt maintenance, replacement of the camshaft, or during routine repair of the cylinder head.
We know that the camshaft oil seal is leaking by the traces of engine oil on the belt or under the camshaft toothed pulley. And having noticed this leak, it is advisable not to put off replacing the oil seal.
After all, you will agree that it is more convenient and profitable to replace the camshaft oil seal on time than to later, in the end, change the camshaft or repair the engine. Incommensurate investments.
The front camshaft oil seal can be changed directly on the engine. But in order to replace the rear camshaft oil seal, you will need either a lift or a pit. And, you will have to disconnect the gearbox and clutch.
Replacement instructions
The sequence of actions when replacing the front and rear oil seals is slightly different. This is because the front oil seal can be replaced directly on the engine itself. Getting to the rear seal is usually more difficult.
Front oil seal
The sequence for replacing the front camshaft oil seal looks like this.
- The car is placed in neutral and the parking brake is applied.
- As with any work performed in the engine compartment, the battery terminals are disconnected.
- The plastic timing belt cover is removed.
- The valve cover is removed, for which you need to unscrew the fastening bolts with a screwdriver.
- A marker marks the location of the belt relative to the camshaft.
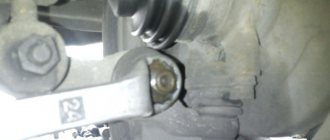
- Then you need to remove the timing belt. You don’t have to completely remove it - just remove the belt from the camshaft timing pulley. To remove it, you need to unscrew the fastening bolt with a 17 mm wrench, securing the pulley from turning. You can use a pry bar for fixation.
- Using a puller, the pulley is removed from the camshaft shank. If the camshaft has 2 pulleys, then both are removed, and the locations of the pulleys are also marked so that they are not confused during further installation.
- The key located behind the camshaft pulley is removed.
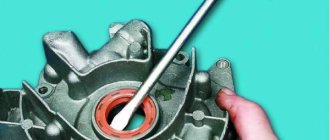
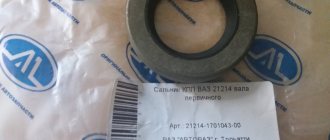
- Then, using a screwdriver or tweezers, remove the used oil seal. You should remove it carefully so as not to scratch the working surface of the camshaft to which the oil seal is attached.
After dismantling the old oil seal, you can proceed to installing a new one and reassembling it.
- The working edge of the new oil seal adjacent to the camshaft is lubricated with engine oil, and the outer part is treated with sealant.
- The oil seal is placed on the camshaft and then pressed using a pressing mandrel.
Further collection of the timing belt is carried out in reverse order.
- A key is placed on the camshaft.
- Then the pulley is installed. If there are two pulleys, then each is installed in the place where it was located.
- The pulleys are tightened using a torque wrench. The voltage torque can be found in the vehicle owner's manual. When tightening, it is necessary to secure the pulleys from turning using a pry bar. First you need to engage fourth gear at the gearbox.
- Then you need to put the belt on the pulleys according to the previously marked marks. You should first inspect the belt for damage, abrasions, etc. Since oil seal leaks are detected when replacing the timing belt, it is often necessary to install a new belt. In this case, it is mounted according to the factory marks.
- The tension roller mounting bolt is tightened. The tension torque can again be found in the car's owner's manual.
- Then the crankshaft is manually turned several revolutions clockwise. This checks the belt tension. If any irregularities are noticed, the tension is further adjusted.
- At the end, the valve cover is secured back and the plastic belt cover is installed.
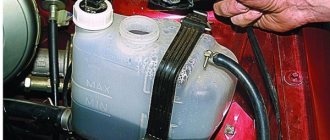
- After replacing the oil seal, you need to add engine oil to the oil tank to the upper mark.
Rear oil seal
Rear oil seal replacement may vary from vehicle to vehicle. For some models, access to the rear oil seal is only possible when driving the car onto a lift or inspection hole and disconnecting the clutch and gearbox drive.
For other car models, access to the oil seal is limited by the camshaft position sensor, which must be removed. To do this you need:
- disconnect the electrical connector of the sensor;
- Unscrew the fastening screw and remove the sensor;
- Using a 10mm wrench, unscrew the bolt securing the gas hose holder to the sensor wire bracket;
- Unscrew the screws securing the sensor cover, remove the cover and the bundle of wires;
- remove the sensor rotor;
- Remove the sensor cover mounting plate.
After this, you can use a screwdriver to remove the rear camshaft oil seal. Replacement is carried out in the same way. After replacing the cuff, the sensor is assembled in the reverse order.
After installing the new oil seal, you must make sure that no oil leaks appear. If the oil seal is installed correctly, then even at high engine speeds the oil should not leak. Otherwise, the sensor is installed or pressed in incorrectly, or there is a manufacturing defect in the product.
How to replace a gearbox seal
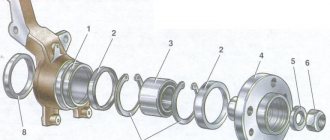
In modern cars, gearboxes are equipped with oil seals for the input shaft, right and left CV joints. Depending on the type of vehicle drive, the number of elements may vary. Oil seals are needed to prevent oil loss from the gearbox housing.
Another function of the oil seal, which puts additional load on it, is protection from dirt and dust that can get inside the gearbox. The question of how much it costs to replace a gearbox seal is difficult to answer right away. The price is influenced by a large number of factors, one of which is the type of oil seal that needs to be replaced (input shaft, right or left CV joint). To carry out high-quality repairs of a manual transmission, it usually takes no more than a day (when replacing an element of the input shaft), and sometimes 4-5 hours are enough.
We recommend
The gearbox seal is located in the clutch housing in the inside of the box. Before replacing it, the casing must be disconnected. To replace an element, you need an overpass or inspection hole.
Before starting work, you need to put reliable stops under the wheels of a car standing on a pit or overpass so that the car does not accidentally move.
What materials are needed to replace the box seal:
- keys for “10” and “13”;
- a curved slotted screwdriver or something similar to a crochet hook;
- awl;
- plastic pipe from under water.
The most common reasons for an element to not work:
- wear due to long-term use;
- mechanical damage from impact;
- deformation.
The correct solution in any of these situations is to replace the gearbox seal. The service life of the checkpoint itself will depend on how well the work is done. As we said earlier, replacement of the element and CV joint is often carried out simultaneously.
First of all, it is necessary to diagnose the gearbox. As a rule, it has to be repaired after 70 thousand km (this depends on the make of the car). The cost of repairs and their speed are affected by how timely the car owner contacts the repairman.
Before starting to repair the gearbox, the specialist removes the drive shafts and dismantles the internal elements of the CV joint. This is done in order to get to the oil seal. Before installing a new element, it must be treated with grease. The oil seal is installed using a special tool - a mandrel.
Step-by-step replacement instructions:
Step 1: Place the car on a lift.
Step 2: Disconnect the wire from the terminal.
Step 3: Remove the flywheel.
Step 4. Remove the clutch housing rear shield facing the bushings.
Step 5. Unscrew the bolts (8 pieces).
Step 6: Remove the holder from the part.
Step 7. Knock it out of the gearbox using a screw and hammer.
Step 8: Take the new element and press it into the holder. Outer diameter - 99(±0.5) mm.
Step 9. The working edge should be inside, if not, you need to turn it over.
Step 10: Remove the torn gasket. It will be attached to the holder using lubricant.
Step 11. Lubricate the edge with engine oil.
Step 12. Also lubricate the crankshaft flange with engine oil.
Step 13. Place the working edge onto the flange.
We recommend
Step 14: Tighten the bolts.
Step 15: Reinstall the crankcase and bushings.
Step 16: Reinstall the flywheel and clutch.
A good owner always makes sure that his car is in excellent condition. So it's all up to you. Look after your car, check it, take it for diagnostics in a timely manner if problems arise. Don't waste a lot of money on service centers. But don't try to carry out repairs yourself if you don't understand it well enough.
Features of replacing the gearbox seal:
- To replace the seals of the internal joints of the front wheel drive, you need to drain the oil from the gearbox.
- You can change the elements of the internal joints of the front wheel drive without removing the gearbox from the car.
- Do not disconnect both front wheel drives at the same time. If you do this, the side gears inside the differential case will become misaligned and it will be impossible to reinstall the drives.
The cost of a gearbox seal may not be the same for all options. It will depend on what kind of element it will be: the input shaft, right or left CV joint. For example, CV joint assemblies are easily accessible to a specialist.
The average time to replace the left or right CV joint oil seal is about 4 hours. It may take more than a day to replace the input shaft element. This is due to the fact that access to it is more difficult; you must first remove the box, which is more labor-intensive. Therefore, the cost of replacing gearbox seals will be higher than those installed on the CV joint.