If even the owners of the new “ten” noted insufficient noise and wind insulation of the door rubbers, then what can we say about well-used cars. The door seals of the VAZ 2110, worn down by time and use, no longer meet even the minimum requirements that are imposed on them by not so demanding consumers of AvtoVAZ products.
Not only can you hear every creaking and rustling sound outside the cabin, but the driver’s left side and knee are “frozen,” and the passenger’s right is “frozen” by the headwind, which freely penetrates through loosely fitting doors and sagging rubber bands. To complete the picture, you should also add raindrops penetrating into the interior.
Door seal per meter
And yet, undoubtedly, any seals wear out, especially at the bottom, in the threshold area. Therefore, the isolation of the interior from external influences can be saved either by replacement or significant modification.
Selection of replacement
You won’t find any kind of advice for naive and gullible car owners on the Internet. Some suggest installing window seals on the VAZ 2110 instead of rubber bands intended for this model, others suggest inserting tubes from droppers inside. In general, there is no limit to skillful imagination.
We will try to focus on the most acceptable options, with proven effectiveness in practice.
So, to replace rubber bands you can use:
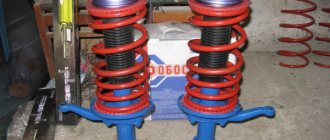
- a ready-made set from the manufacturer - designed specifically for the VAZ 2110. These are mass-produced rubber bands that fit perfectly on all doors. They are double-circuit and allow for additional sealing;
- measured VAZ rubber bands. That is, on sale you can find both ready-made, “soldered” rubber bands for each door, and a rubber band per meter for the same purpose;
- seals for Priora - according to experts, they are even better. Firstly, they are three-chambered, with a steel strip for fixation. Secondly, they are of higher quality, “hold” their shape longer, and do not wrinkle as much;
Priorovsky door seal - It is also possible to install rubber bands from GAZelle.
Tip: Before choosing a seal, you need to very carefully measure the internal length of the rubber bands on the front and rear doors. It’s better to take a little more if you’re not using a “native” set, because shortening is always easier than sharpening.
In addition, if you plan to modify it for tighter insulation, you will also need a tube for additional door sealing, about 8 mm in diameter made of silicone or polyurethane.
For fixation, disposable pins and glue are used.
Additional seal for the car body
Owners of Lada Granta/Kalina can use the RGI-135 seal:
Universal method: We begin installing the rubber seals from the bottom corner of the windshield. We glue the seal onto the gutter seal, and glue part of the seal onto the plastic intakes of the windshield. Make sure there are no gaps between the doors and the body.
We go to the end of the back door and go down. We glue the lower seal onto the plastic threshold, and not above it. Otherwise, it will be of no use.
Instead of a construction D-shaped seal, you can use a seal from UAZ Patriot:
After installing all the additional seals, the doors will be noticeably more difficult to close in the first days of operation. After a week, the seal will take the desired shape and the doors will close as before.
There are several positive effects after such modification. The seal plays the role of sound insulation, whistling while driving will disappear, and road noise will decrease. In addition, less dust will enter the car interior, and the doors will close noticeably quieter with a pleasant sound.
In the survey we determine which method of installing an additional seal is the best. Along with the installation of additional sealing, it is recommended to install additional sound insulation of the doors.
Photo: Lexa16 in-flight magazine
Keywords: Lada Priora doors | seals for Lada Priora | sound insulation of Lada Priora | Lada Granta doors | seals for Lada Granta | soundproofing of Lada Granta | Lada Kalina doors | seals for Lada Kalina | soundproofing Lada Kalina
+11
Share on social networks:
Found an error? Select it and press Ctrl+Enter..
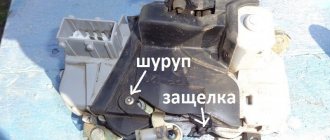
Dismantling
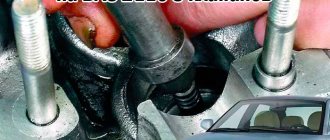
After purchasing everything you need, you can first begin dismantling and then installing a new seal. The first stage is removing the plastic facing panel from the threshold. This is done using a regular flat-head screwdriver. Just try to do everything carefully, without damaging the plastic clips that secure the panel.
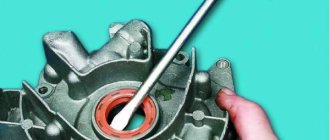
This is followed by the removal of old rubber bands. This is done by tearing it off, then removing the residue using available tools. If you need to remove the remaining glue or small debris, use a solvent (be careful that it does not dissolve the paintwork of the car).
Next, you need to clean the entire doorway from dust and various contaminants, paying special attention to the lower parts. You can do dry cleaning with a brush and vacuum cleaner. If you still need to wash it, let the surface dry thoroughly before installing the rubber bands.
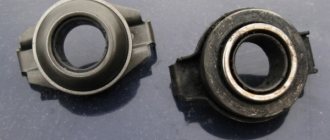
Application of a three-chamber seal
All seals can be divided into:
- Single-chamber universal - require installation of additional protection, suitable for windows, doors and hood. They are not produced as factory equipment for cars due to the low degree of security.
- Two-chamber - factory seals for VAZ-2114. The double-circuit structure allows, if necessary, to install an additional layer of sealant.
- Three-chamber - for example, sealing rubber for Lada Priora. They are additionally equipped with a steel strip for fixation, which allows them to retain their shape for a long time.
Three-chamber seal
Three-chamber seals provide the greatest degree of protection of the car interior from cold and noise. Currently, they are used in the production of domestic cars.
Attention! After installing the three-chamber sealing rubber, car owners note that they need to apply more force when closing the door. This is a temporary phenomenon. It is due to the fact that the VAZ-2114 was initially equipped with double-circuit tires, and the door was designed specifically for its thickness. Also, the new sealing layer always has greater rigidity. Gradually the new seal will “take hold” and the door will close easier.
Installation
This work, in principle, is not too difficult; it can be done even without special training. Just take into account that the installation of the seal and the simultaneous modification of wind and noise insulation must be carried out carefully and meticulously, then you will ensure greater interior comfort for several years to come.
The installation is carried out according to the following algorithm:
- Even if you have previously measured the seal seat, do it again, following the popular wisdom that it is better to measure seven times;
- Cut the seal to the required length with a small margin (a couple of centimeters). Of course, if you bought a ready-made “ten” set of rubber bands, then ignore these two points;
- Inside the seal, insert the polymer or silicone tube that you have. Accordingly, its length should also correspond to the elastic band. This tube is designed to give elasticity to the entire insulating structure and create a better fit of the rubber bands, thereby protecting the interior from unnecessary additional “ventilation” and unnecessary sounds;
- Glue the side curly seal at the bottom;
- A solid rubber band can be worn anywhere. And for measuring, it is best to choose a starting point between the door awnings (or about 30 cm from the bottom of the threshold). Whether you move the installation up or down does not matter;
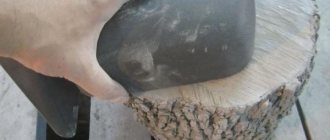
- It is necessary to push the figured profile all the way down. This is done only with the help of a rubber or wooden mallet (hammer);
- When you walk around the entire perimeter, you will probably find that there is a lot of material. The insert element (tube) must be cut exactly end-to-end, and the seal must be cut in such a way that there is slight deformation of the adjacent areas. Thus, there will be no “siphoning” through the joint;
- Install the piston, remount the plastic sill trim;
- Carefully and tightly glue the second contour along the edge of the door. Let it dry.
Almost immediately when closing the door you will hear a softer dull sound. And while driving you will not hear annoying noises and whistling of the cold wind penetrating inside. After a while, you see, you will forget about the pain in your previously cold left knee.
Additional seal
If you have completely replaced old rubber bands with new ones in all doors, then no additional insulation is needed. But in cases where you do not want or do not have the opportunity to do this immediately, and the old rubber bands have become crushed and worn out, you can install additional VAZ 2110 door seals as a temporary measure.
It could be a thin tube for thermal insulation. These are used in refrigeration equipment, etc. The material is a bit like black foam rubber, but denser. You may come across advice - to use meter seals for windshields in this capacity, but this is impractical. Firstly, it is quite difficult to find one, it is much more expensive, and is not easy to install - it is difficult to achieve a high-quality tight fit. seal
Flex seal
Width
Front door
Front door
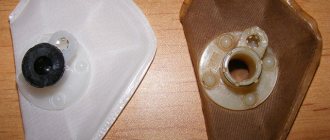
Rear door seal sticker
Result in the rear door opening
Result with door closed
Close-up of the opening
However, regardless of the material chosen, its installation is no different.
As a rule, additional insulation of doors is carried out only in their top and rear parts. If there is a strong need - and in the front part, you just need to be especially careful in the area of the hinges so that the material does not interfere with the normal closing of the doors, otherwise some on the forums complain that after such actions problems arose with closing the doors.
Universal D-shaped seal
Universal D-shaped seal
Result on the rear doors
Result on the rear doors
It is irrational to install anything additional in the threshold area. Dirt and water will accumulate there faster, and then corrosion, rust, holes...
Additional vertical door seal RKI 19
Additional vertical door seal RKI 19
Additional vertical door seal RKI 19
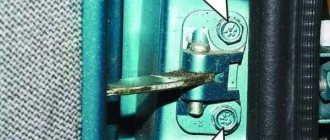
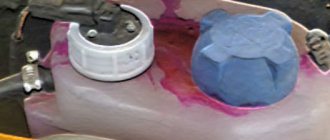
The additional seal is simply glued to the body (not to the door), close to the existing one. When choosing a glue, make sure that it does not react with the paint surface of the car.
After gluing, close the doors and check whether the seal is coming out. If necessary, it is carefully trimmed.
Additional seal on the car door
We remove dirt and then degrease the edge of the car door. We glue the seal along the edge of the door, as shown in the photo.
All that remains is to close the gap with the seal between the doors (front and rear). Owners of Lada Granta/Kalina install additional seals of the RKI-19 type:
RKI-19 is not suitable for Lada Priora, because... the distance from the body to the doors on the Priora is significantly greater. It would be more correct to use a Z-shaped seal and install it on the edge of the rear door as follows: